An ice cream is a dairy product produced by dynamically freezing the pasteurized ice cream mix. The components of the ice cream mix include a mixture of milk, cream, sugars, stabilizers, emulsifiers, other food additives, and the ice cream overrun.
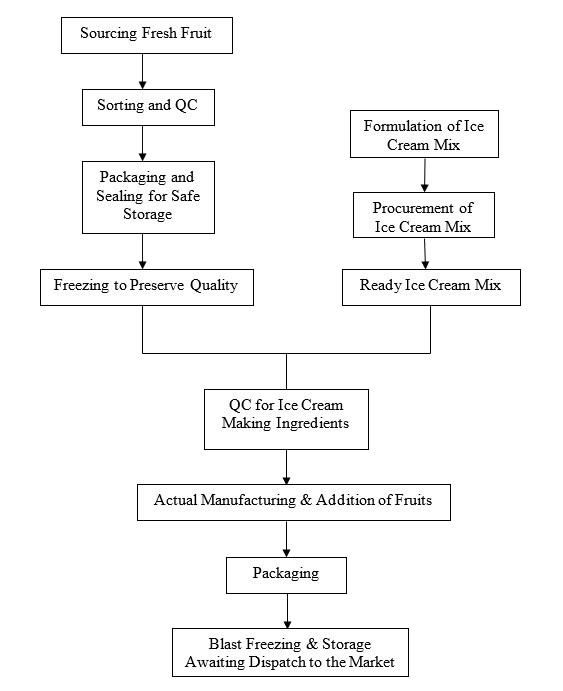
This article will articulate the fundamentals of ice cream-making process. We will make an elaborate effort at highlighting the components of the ice cream, including the ice cream overrun. Ice cream making is a very delicate process that requires high precision and delicate manipulation of parameters to produce high quality ice cream.
Many things can go wrong; therefore, it is necessary to know the steps that will guide you to produce high quality product. It is extremely important to keep the equipment spotlessly clean. (Learn how to sanitize ice cream making equipment here).
All dried ingredients are weighed while liquid ingredients are proportioned by volume. In smaller capacity manufacturing plants, the dry ingredients are weighed and added to the mixing tanks manually.
These mixing tanks are designed such that they are heated indirectly (e.g. double jacketed vats) and they have very efficient agitators to facilitate uniform distribution of heat. Large-scale ice cream manufacturing plants use automatic batching systems that are often custom built to the user’s specifications.
Some blending systems contain both meters and load cells so that the former can be used to check on the reliability of the former and vice versa. These large-scale plants usually have multiple mix tanks whose volumes correspond to the plant’s hourly capacity (determined by the capacity of the pasteurizer) to ensure that the process is continuous.
It is important to ensure that the dried ingredients are properly suspended in the mixing tank to avoid lumpiness of the mix. Proper suspension is achieved by:
Gelatin is best added after thorough mixing with equal quantity of sugar, which is added cold into the mixture. It can also be sprinkled onto the surface of cold liquid and allowed to soak for about 30 minutes before heating.
Another option is to soak the gelatin in some water and immediately heat to dissolve the gelatin then add to the mix in the tank. If sodium arginate is used as a stabilizer, add it at the heating stage when the mix attains the temperature of about 66°C.
If frozen butter/cream is used, then cut them into small pieces and add into the mix in good time to allow total melting before the pasteurization temperatures are applied. Flavors are added just before the mix is frozen (because they are volatile and will escape if added before pasteurization).
The mix in the mixing tank is heated to 70°C and held for 30 minutes. The mix is then passed through the homogenizer at between 140 – 200 bars then immediately cooled to 50°C.
Homogenization increases viscosity mechanically. The mix is then passed to the aging tank.
Pre-heat the mix to 73-75°C then homogenize at 140 – 200 bars then pump the mix to the PHE and pasteurize at 83 - 85°C for 15 seconds. Cool the mix to 5°C and transfer to the aging tank.
The mix is aged for between 4 – 24 hours at 2 - 5°C under continuous agitation. During the aging process, the following occur:
The batch freezer has a double walled cylinder firmly fixed on its base and has agitators and scrappers (dashers) that scrape off the frozen ice cream from the walls.
The agitators beat air into the freezing ice cream mix. Freezing of the mix is achieved by circulating cold brine/ammonia in the jacket of the cylinder. Freezing is done between -3°C and -6°C.
From the aging tanks, the mix is pumped to the continuous freezer where air is whipped in as it is frozen between the temperatures of -3°C and -6°C. The increased volume of the ice cream due to incorporation of the air is the overrun (80 – 100%).
The ice cream leaving the continuous freezer has a texture similar to soft ice hence needs to be taken to the hardening tank, then to the modelling and finally packaging. Continuous freezing facilitates faster freezing leading to very small ice crystals.
This is the volume of the ice cream obtained in excess of the volume of the mix. It is expressed as a percentage overrun. The amount of air incorporated into the mix depends on the composition of the mix. The overrun is regulated so as to produce a product with the right body texture and palatability.
Too much air will result in a fluffy, snowy unpalatable ice cream while too little air will result in a soggy and heavy ice cream. The general rule: Mixes with high total solid content justifies higher percentage incorporation of air than those with lower total solids content.
Generally, the amount of overrun should be 2 – 3 times the quantity of total solids of the ice cream mix.
% overrun = [(unit weight of mix – unit weight of finished ice cream)*100]/unit weight of finished ice cream.
The ice cream is extruded into moulds with different shapes and wrapped using glassine (oil resistant paper) before taking it into the hardening tunnel.
The already packaged ice cream is exposed to a temperature range of -20°C to -40°C in the hardening tunnel for between 6 – 8 hours for larger packages and 30 minutes for smaller packages.
The hardened ice cream is then stored at temperatures of ≤25°C. The storage shelf life is about 9 months. Hardening completes the ice cream freezing process and stabilizes the product so that it does not melt down too quickly.
Rapid freezing yields a good textured product and is economical for production purposes. Here is a video of the ice cream making process using a batch freezer.
Video by UCC Culinary Arts
Ice cream making process, whether at home or at the factory essentially uses the principles we have outlined above. If you are wondering if it is possible to make an ice cream without expensive plant installed. The answer is an emphatic yes.
However, you will have to contend with the fact that the overrun will not be properly incorporated. The ice cream machine has the capability to incorporate the air under constant speed and refrigeration temperatures.
Achieving the consistency of an ice cream machine will be a commendable feat. We are going to outline a recipe you can use to make your own fresh serving of ice cream at home.
What do we need?
First, we need to make the ice cream base. It will help us to incorporate all the ingredients that we need to add into our ice cream.
The ice cream making process using zip lock bags follows the following 9 steps:


Comments